How to Create an AI Video in 3 Minutes
Turn any image into animated content using 100% free AI tools.
The Moment I Realized AI Video Creation Can Be Effortless
When I started playing with AI video generators — long before I began using them professionally — I spent a lot of time experimenting with Grok. I had a basic subscription that came included with my X Premium plan, so I figured I might as well explore what it could do.
One day, after creating an image, I noticed the “Animate” button. I honestly don’t know if it had always been there and I just never paid attention, or if it was a brand-new feature that had just been released — but that moment changed everything.
It was love at first sight.
I didn’t know anything about AI video back then, and honestly, most of my early attempts failed (back in early 2025 — which, in the world of AI, already feels like a lifetime ago).
But with Grok, all it took was a single click to turn a static image into a funny animated video — no editing skills, no complicated tools, no effort.
Today, I’ll show you exactly how to do it.
All you need is:
Step 1 : Choose your image
You can use a selfie, but honestly, almost any image can work — whether it’s a real photo or something generated with AI. The key is choosing something visually interesting that will look good once it starts moving.
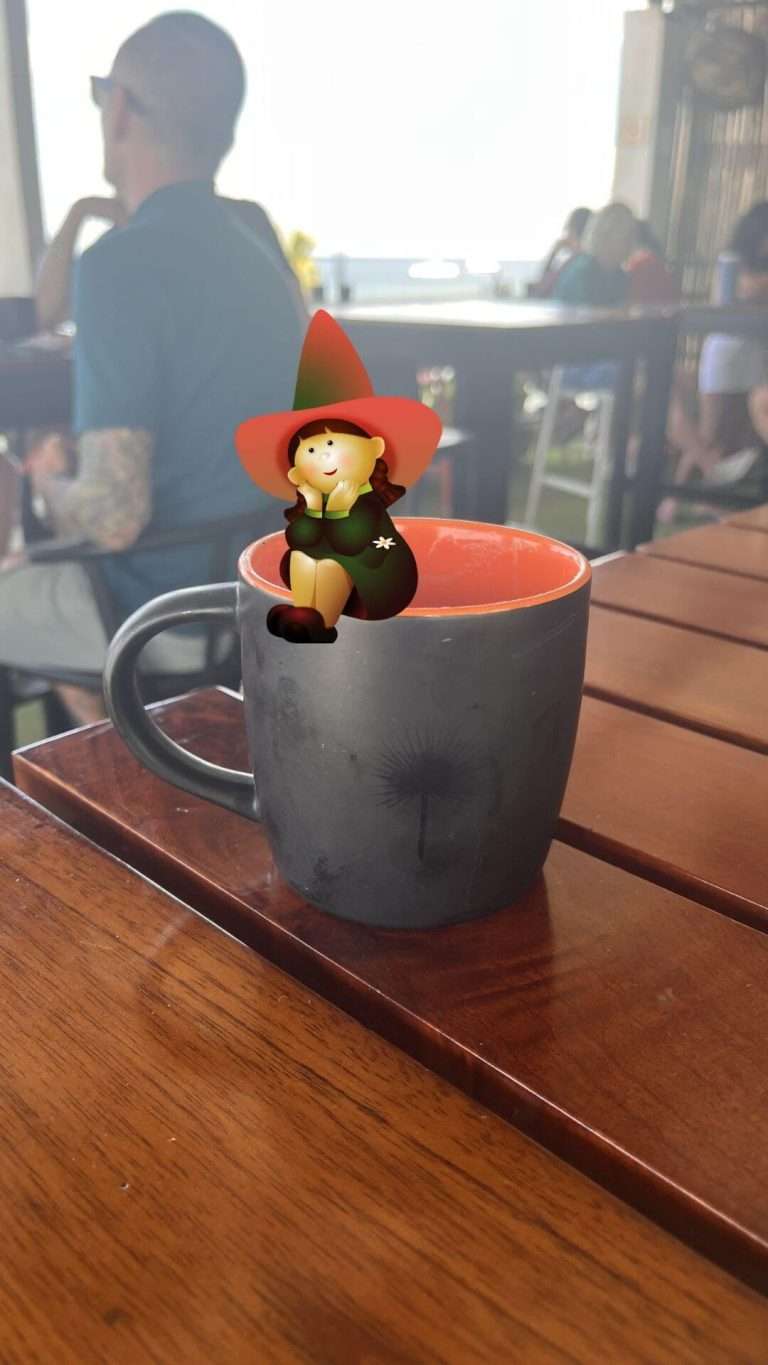
Since I was sitting in a café when I made this video, I simply photographed what was right in front of me. And yes… it also turned into some accidental free advertising for the place where I was sitting for five hours with a single cup of coffee.
I recommend using a vertical format, which works best for social networks and mobile viewing and makes the final animation feel more natural on screen.
Here’s the image I used…
Step 2: Upload your image to Canva
Upload your image to Canva and place it inside a vertical 9:16 design. This format is ideal for TikTok, Instagram Reels, and YouTube Shorts, and it also helps the animation feel more immersive on mobile screens.
Once your image is inside the canvas, take a moment to position it properly. You can zoom in slightly, center the main subject, and crop out unnecessary background elements that might distract from the animation later.
If the image feels a bit plain, this is also a good stage to make small visual improvements like adjusting brightness, contrast, or sharpness. These tiny tweaks can make the animation look much more professional once it comes to life.
Step 3 – Add a Funny or Creative Element
Now comes the fun part. This is where you give your image personality.
You can add stickers, funny objects, speech bubbles, emojis, or any visual element that creates contrast with the original photo. The goal is to introduce something unexpected that will make the animation more entertaining once it starts moving.
Canva offers a huge library of graphics, illustrations, and effects you can drag and drop directly onto your image. But you’re not limited to that — you can also upload your own PNG elements or AI-generated objects to make the result more unique.
Try not to overcrowd the image. One strong, funny element is usually much more effective than many small ones competing for attention.
Step 4 – Animate It with Grok
Once your design is ready, export the image from Canva and upload it to Grok.
After selecting your image, you’ll notice how Grok immediately starts generating motion using its default animation settings. In many cases, you don’t even need to adjust anything — the automatic result already looks dynamic and fun.
If you want more control, you can experiment with different motion styles, camera movements, or intensity settings. Small adjustments can completely change the feel of the animation, from subtle cinematic motion to exaggerated cartoon-like effects.
The best part is that the entire process takes seconds. No timeline editing, no keyframes, and no complicated video software — just upload, click animate, and let AI do the heavy lifting.